
Блоки по дизайну системных страниц
Всё также использованные в SCP-1417-RU — Но один человек может изменить настоящее, а также на странице новостей, главной и ещё где-то. Хорошо сочетаются с широкими спойлерами оттуда же.
Заголовок
Содержимое
`module CSS`
.addendum-block {
  margin: 16px 0;
  border: 1px solid #dcdcdc;
  background: white;
  box-shadow: 0 2px 3px #ccc;
  position: relative;
  overflow: hidden;
}
.addendum-title {
  text-align: center;
  padding: 4px 24px;
  text-transform: uppercase;
  background: linear-gradient(to top, #d8d8d8, #ececec);
  border-bottom: 1px solid #dcdcdc;
}
.addendum-content {
  padding: 8px 24px;
}
[]

]
]
Заголовок
[]

]
Содержимое
[]
[]
Это, конечно, ещё не всё что я делал, но это то, что мне пришло в голову сюда добавить. Буду обновлять в будущем.
Эта страница
На ней сделаны эксклюзивные табы, которые никому не советую копировать из исходника, ибо в плане кода реализованы пока что не очень хорошо, а ещё сайдбар сделан по наработкам предположительного будущего сайдбара в обычной теме сайта. Когда-нибудь вы увидите что-то подобное на всём сайте.
На будущее: ко мне можно обратиться через контакты, чтобы я помог с оформлением авторских статей. Я не кусаюсь.
How to create a quiz using the Telegram app
Step 1: Download the Telegram app from the Play Store. Open the app and sign into the app. If this is your first time, you will need to sign up with the app.
Step 2: Open the app and tap on the search () icon at the top right.
Step 3: Search for @quiz and select Quiz Bot.
Step 4: Tap on START.
Step 5: Type /newquiz in the message area and send or tap on the /newquiz displayed on the screen.
Step 6: Enter the title of the quiz.
Step 7: If you wish to add more details regarding the quiz, add the description. Else tap /skip.
Step 8: Tap on “Create a question”.
Step 9: Type the first question and add the answer options using the “Add an Option” button.
Step 10: Select the correct answer using the tick circle and then tap on the CREATE option on the top right.
Step 11: You will be able to see the question you just added.
Step 12: You can add more questions to the quiz by following step 7 to step 10.
Step 13: After adding all the questions, tap on /done.
Step 14: Select the time limit of each question.
Step 15: Select whether you would like to shuffle the questions and answers.
Step 16: Quiz created message will appear and from there you will be able to share it.
Step 17: Tap on “Share quiz”, select a group and then tap again on the quiz title.
Step 18: Tap “Start this quiz” to view the description of the quiz.
Step 19: Tap on “I am ready!” to answer the questions.
Step 20: You can try again to increase your scores. But the score obtained only during the first attempt will be considered for the leaderboard. Your quiz report will be displayed when all the questions have been answered or when the timer runs out.
Какие возможности предоставляет Quiz mode в Telegram?
Quiz mode в Telegram открывает большие возможности для проведения различных интерактивных тестов и викторин. С его помощью вы можете быстро и легко создавать свои собственные вопросы и ответы, а также установить время на ответ.
Одна из основных функций Quiz mode — возможность настройки правил и ограничений для участников тестирования. Вы можете установить ограничения на количество попыток ответить на вопрос, задать минимальный порог правильных ответов для успешного прохождения теста и многое другое.
Благодаря Quiz mode, вы можете проводить различные тесты на знание литературы, истории, кино, музыки, и многого другого. Кроме того, вы можете создавать викторины и тесты на профессиональные темы, такие как программирование, маркетинг и бизнес.
Важно отметить, что Quiz mode в Telegram достаточно гибкий и удобный в использовании. Вы можете использовать в текст вопроса, а также загружать изображения в качестве варианта ответа
Для более сложных тестов вы можете использовать таблицы и другие элементы форматирования.
В заключение, Quiz mode в Telegram — отличный инструмент для организации интерактивных тестов и викторин. С его помощью вы сможете проводить разнообразные тесты на любые темы, а также управлять их параметрами и настройками.
Conclusion
This article shows that the combination of Sapper, Svelte and Prisma allows for quick full-stack prototyping. Using the Sapper framework and Prisma, we created a full-fledged quiz application that allows users to pass quizzes, receive and share results, as well as create their own quizzes.
After future refinements, this application could support real-time mechanics, since Prisma supports notifications about real-time database changes. And these are not all possibilities of the stack.
The article was written in collaboration with software developers at Digital Clever Solutions and Opporty.
Main Page
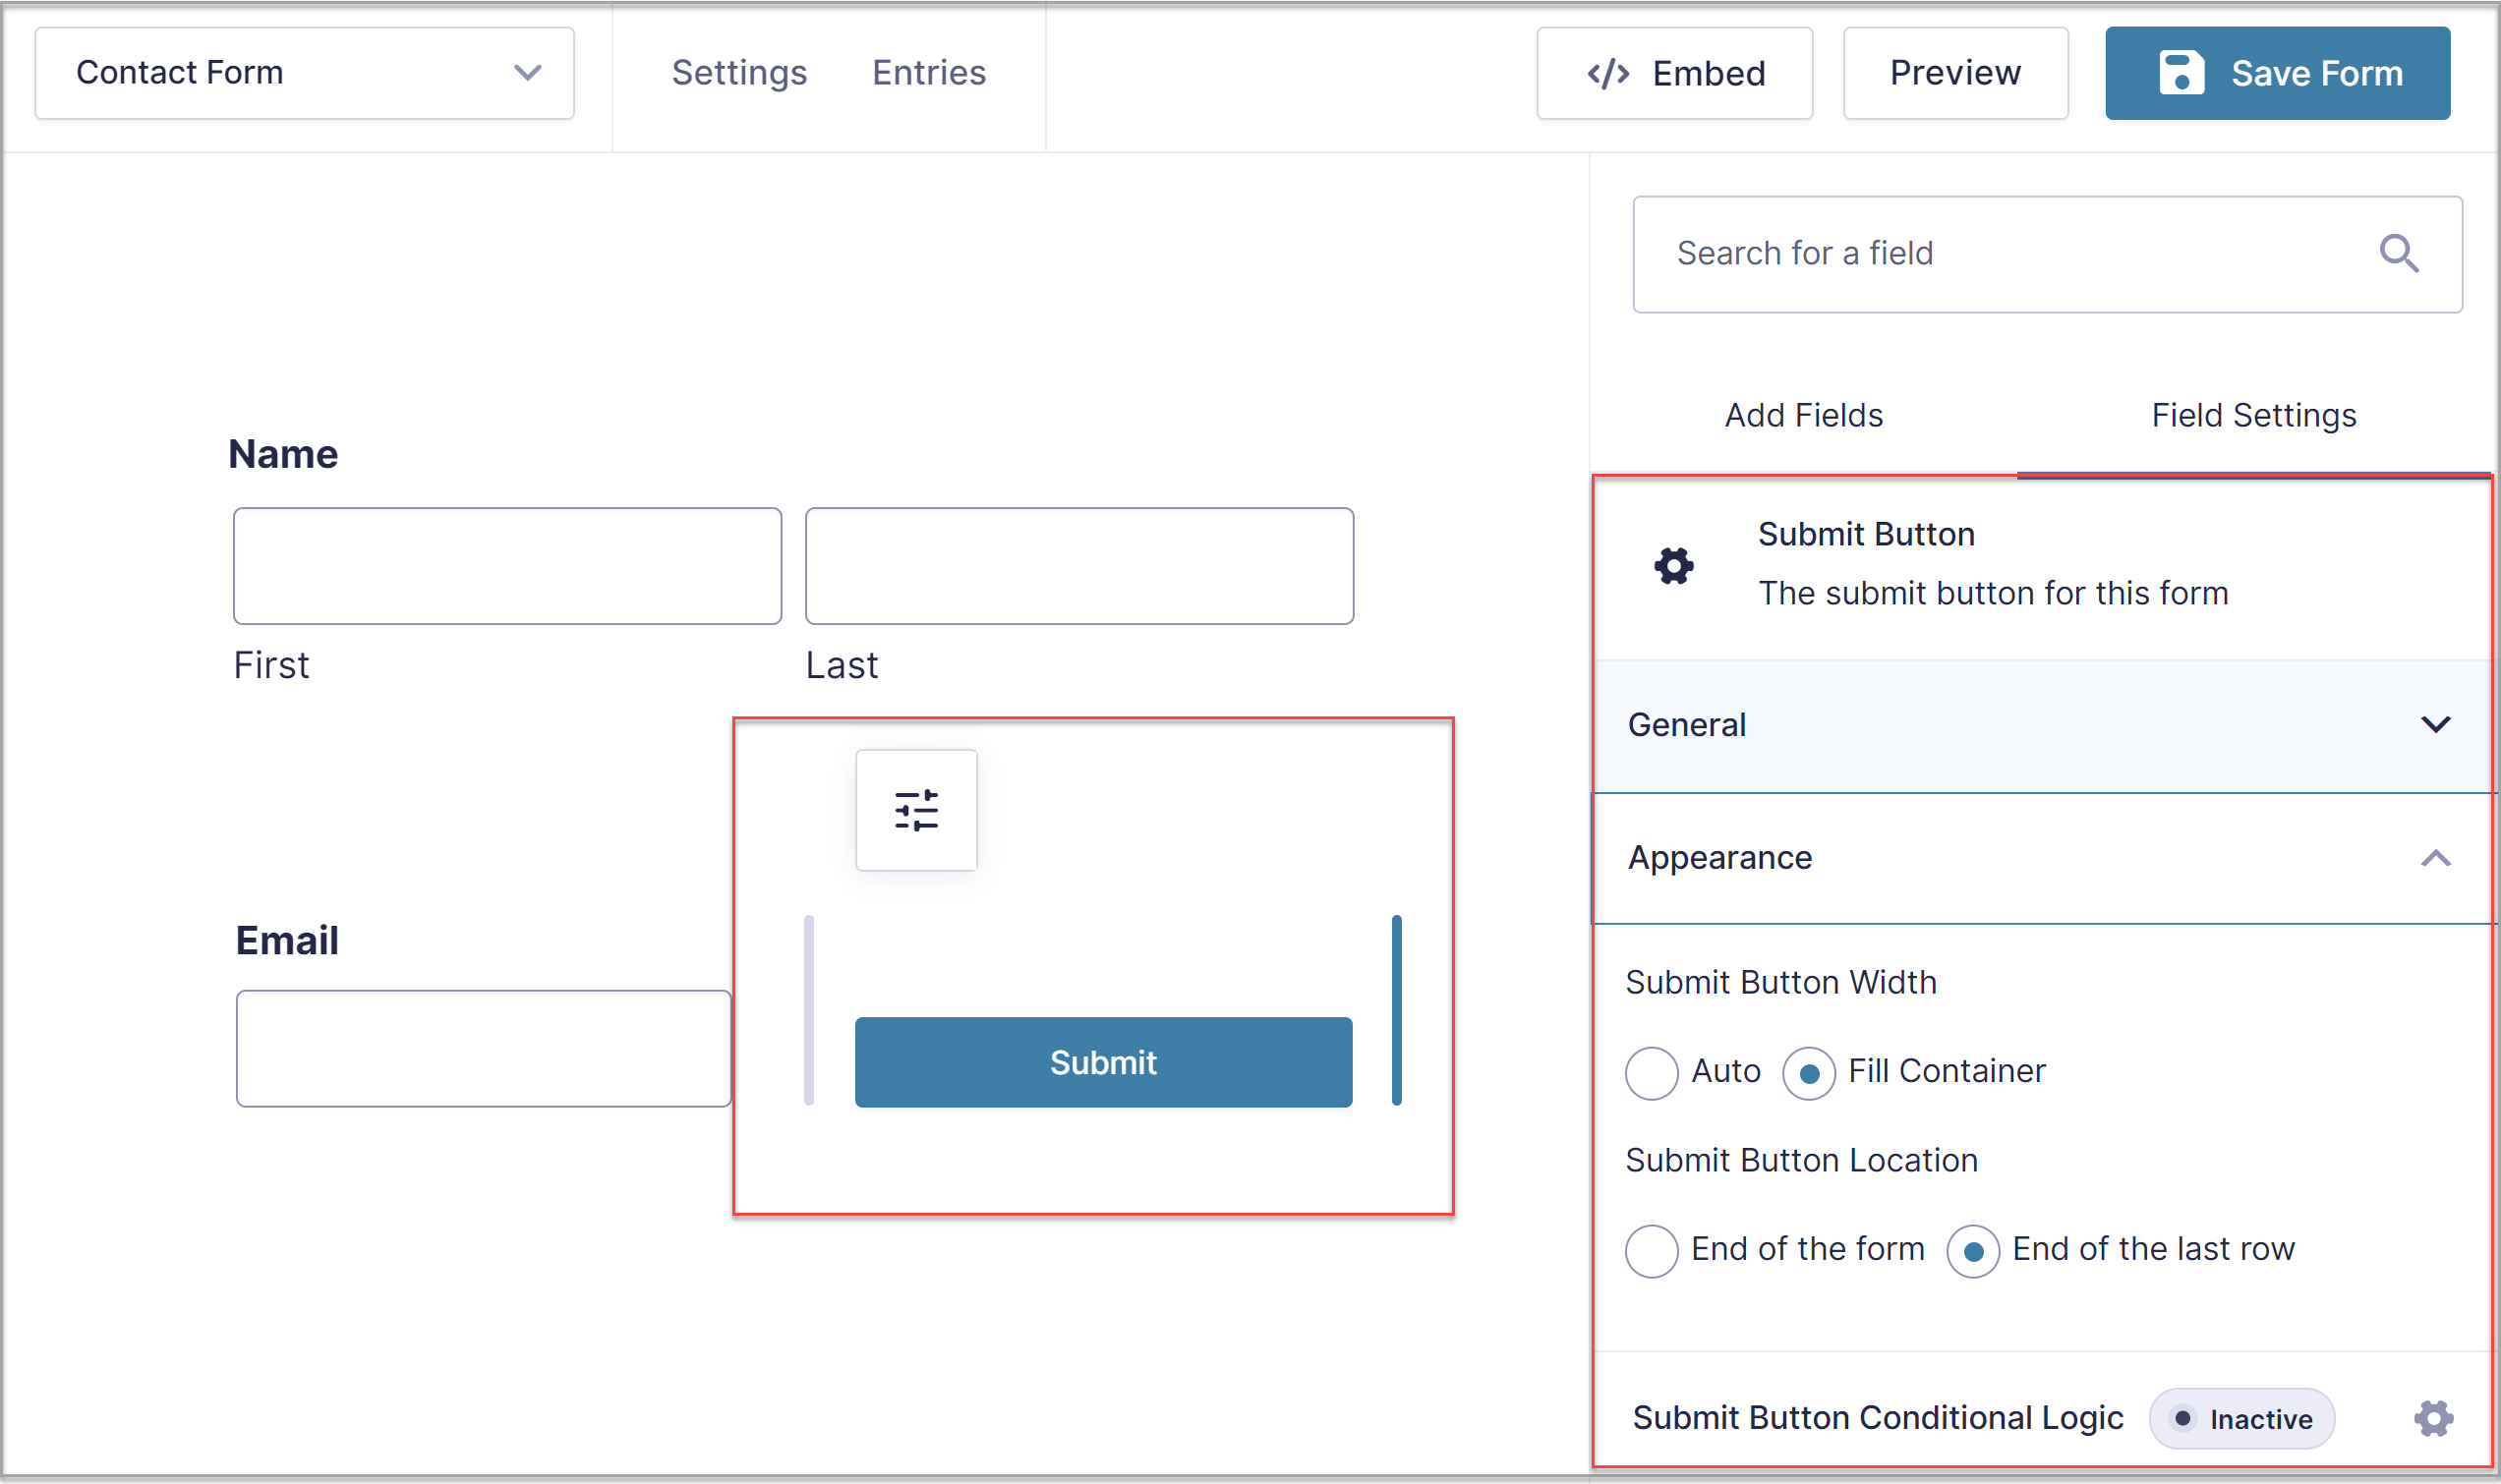
We need to display the created quizzes on the main page. With a large number of requests, each of them takes a long time to process and rendering is not nearly as fast as we would like. For this reason, pagination should be used on the main page.
This is easy to reflect in a request:
JavaScript
```graphql
query GetQuizes($skip: Int, $limit: Int) {
  quizzes(skip: $skip, first: $limit) {
id,
title,
participantCount
  }
}
```
In this request, we define two variables: and . They are sent to the request. These variables are already defined there, in the scheme generated by `Prisma`.
Next, we need to pass these variables to the src / resolvers / index.js request resolver.
JavaScript
```js
export const quizzes = async (parent, args, ctx) => {
return await ctx.prisma.quizzes(args);
}
```
Now requests from the application can be made. We update the preload logic in the `src / routes / index.svelte` route.
JavaScript
```svelte
<script context="module">
  import gql from 'graphql-tag';
  import client from "../client/apollo";

  const GraphQLQueryTag = gql`
query GetQuizes($skip: Int, $limit: Int) {
   quizzes(skip: $skip, first: $limit) {
     id,
     title,
     participantCount
   }
}
  `;

  const PAGE_LIMIT = 10;

  export async function preload({ query }) {
const { page } = query;

const queriedPage = page ? Number(page) : 0;

const {
   data: { quizzes }
} = await client.query({ query: GraphQLQueryTag, variables: {
     limit: PAGE_LIMIT,
     skip: PAGE_LIMIT * Number(queriedPage)
   }
});

return {
   quizzes,
   page: queriedPage,
};
  }
</script>
```
In the function, we define an argument with the field. The request parameters will be sent there. We can determine the current page through a URL in the following way: http://localhost:3000?Page=123.
The page limit can be changed by overriding the variable.
JavaScript
```svelte
<script>
  export let quizzes;
  export let page;
</script>
```
The last step for this page is the markup description.
JavaScript
```svelte
<svelte:head>
  <title>Quiz app</title>
</svelte:head>

{#each quizzes as quiz, i}
  <a href="quiz/{quiz.id}">
<div class="flex flex-wrap bg-white border-b border-blue-tial-100 p-5">
   {i + 1 + (page * PAGE_LIMIT)}.
   <span class="text-blue-500 hover:text-blue-800 ml-3 mr-3">
     {quiz.title}
   </span>
   ({quiz.participantCount})
</div>
  </a>
{:else}
<div class="text-2xl">No quizzes was added :(</div>

<div class="mt-3">
   <a
           class="bg-blue-500 hover:bg-blue-700 text-white font-bold py-2
           px-4 rounded focus:outline-none focus:shadow-outline"
              href="create"
   >
     Create new Quiz
   </a>
</div>
  {/each}

{#if quizzes.length === PAGE_LIMIT}
  <div class="mt-3">
<a
         class="bg-blue-500 hover:bg-blue-700 text-white font-bold py-2
         px-4 rounded focus:outline-none focus:shadow-outline"
         href="?page={page + 1}"
>
   more...
</a>
  </div>
{/if}
```
Navigation between pages is implemented using regular links. The only difference is that the route name or parameters are passed to the attribute instead of the source address.

#Troubleshooting Ant Design Forms: Second Form Undefined Issue in Modal Select onChange
The issue you’re facing with the second form being undefined upon select onChange in your modal could be due to various reasons. One common mistake is not properly referencing or initializing the form in your code.
To troubleshoot, en that you have correctly referenced the second form in your code. Here’s an example using Ant Design (Antd) forms:
Check your code for similar patterns and en that the second form is properly initialized and referenced.
If the issue persists, please provide more details or code snippets, and I’d be happy to assist you further.
Unsure if I am the best fit to write a Recommendation Letter for a Research Internship
Requirements
Earlier, we provided the application data model in the GraphQL schema. But it is very abstract and doesn’t show how the application should work and what screens and components it consists of. To move on, we need to consider these issues in more detail.
The main purpose of the application is quizzing. Users can create quizzes, pass them, receive and share results. Based on this functionality, we need the following pages in the application:
- The main page with a list of quizzes and the number of participants for each
- A quiz page that can have two states (user voted / not voted)
- A quiz creation page
Let’s get started.
Quiz Page
Now we need to develop the most important page of the application. The quiz page has to provide answer options. Also, results and selected options have to be displayed to those who have already passed the quiz.
Following the Sapper convention, we create the src / routes / quiz / .svelte route file.
In order for the quiz to be displayed correctly, we need to create a GraphQL request that will return:
- request
- the results by each option of the quiz
- of the answer option if the client has already participated in the quiz
JavaScript
```svelte
<script context="module">
import gql from 'graphql-tag';
import client from "../../client/apollo";

const GraphQLQueryTag = gql`
query GetQuiz($id: ID!, $sessionId: String!) {
   quiz(where: { id: $id }) {
     id,
     title,
     participantCount,
     variants {
         id,
         name,
         value
     }
   }

   sessionResults(where: { quiz: { id: $id }, sessionId: $sessionId}, first: 1) {
     variant {
         id
     }
   }
}
`;

export async function preload({ params }, session) {
const { id } = params;

const {
     data: { quiz, sessionResults:  }
} = await client.query({ query: GraphQLQueryTag, variables: {
         id,
         sessionId: session.id
     }
});

return {
     id,
     quiz,
     sessionId: session.id,
     sessionResult
}
}
</script>
```
Russian Branch
-
- Новости
- Новые статьи
- Свежие правки
- Новые сообщения
-
- Регистрация
- Правила публикации
- Контакты администрации
- Часто задаваемые вопросы
-
- Как написать SCP-объект
- Оформление
- Руководство по тегам
- Список наиболее раскрытых тем
- Очерки
- Хаб визуальных тем
- Список авторства
- Авторские страницы
-
- Глоссарий
- Планы на перевод
- Объекты без перевода
- Руководство по тегам
- Хаб визуальных тем
- Список авторства
-
- Старый Полигон
- Архив статей
- Архив конкурсов
- Архив новостей
- Site 7 Midnight Radio
- Site 7 Media Archive
-
- Чат
- Форум
- Обсуждения
- Идеи и творчество
- Вопросы перевода
- Техническое
- Трелло
-
- Новости
- Новые статьи
- Свежие правки
- Новые сообщения
-
- Регистрация
- Правила публикации
- Контакты администрации
- Часто задаваемые вопросы
-
- Как написать SCP-объект
- Оформление
- Руководство по тегам
- Список избитых штампов
- Очерки
- Список авторства
- Авторские страницы
-
- Глоссарий
- Планы на перевод
- Объекты без перевода
- Руководство по тегам
- Хаб визуальных тем
- Список авторства
-
- Старый Полигон
- Архив статей
- Архив конкурсов
- Архив новостей
- Site 7 Midnight Radio
- Site 7 Media Archive
-
- Чат
- Форум
- Обсуждения
- Идеи и творчество
- Вопросы перевода
- Техническое
- Трелло
Описание функционала
Quiz mode в Telegram – это режим, предназначенный для создания и прохождения викторин. Он позволяет создавать вопросы и ответы, выбирать правильный вариант ответа, устанавливать время на ответ и проводить конкурсы и викторины.
Функционал Quiz mode включает возможность создавать как одиночные вопросы, так и викторины с несколькими вопросами. Викторина может содержать от 2 до 10 вопросов.
При создании вопроса можно выбрать тип ответа: текстовый или с выбором варианта ответа из нескольких предложенных. В случае с вариантами ответа можно установить правильный вариант, а также добавить комментарий и объяснение к данному вопросу.
Quiz mode также позволяет устанавливать ограничение на время ответа на каждый вопрос викторины. Время может быть установлено от 10 до 120 секунд. После прохождения викторины можно узнать свой результат и посмотреть правильные ответы на все вопросы.
Этот режим может быть использован как для неформального общения с друзьями, так и для организации крупных игровых мероприятий, в которых могут принять участие несколько человек одновременно.
How to create a quiz using Quizzer app
Step 1: Download and install the quizzer app.
Step 2: Launch the app.
Step 3: Tap QUIZZES.
Step 4: Tap the Plus () icon to create a quiz.
Step 5: Enter the Quiz name and tap on SAVE.
Step 6: Tap again on the Plus () icon to add questions.
Step 7: Select your preferred Question Type.
Step 8: Enter the first question with multiple options and tap on the save () icon at the top right.
Step 9: Your first question will be displayed under the quiz title you selected. To add more questions to the quiz, use the Plus icon at the bottom right.
Step 10: Tap on the Save button when done.
Step 11: Tap the Back () button after adding all the questions.
Step 12: Tap and hold on the quiz you created.
Step 13: Tap Share.
Step 14: Click copy () icon and share the link to your friends by just pasting it. Or you can use the app drawer to share it directly with your friends.
Step 15: To take any quiz, tap the Exam option.
Step 16: Tap on Quizzes and then select the title of the quiz you wish to attempt.
Step 17: Then tap OK to begin. You can also select multiple quizzes at the same time and attempt it.
Step 18: Change the settings of other options according to your needs and click the Start button.
Step 19: You can check the Summary of the test after attempting it.
Step 20: You can review the quiz based on correct/wrong attempts as well.
Disclaimer
We will intentionally not implement the authorization/registration of quiz participants, but we assume this may be important under some scenarios. Instead of registering/authorizing clients, we will use sessions. To implement session support, we need to update the src / server.js file.
For smooth operation, we also need to install additional dependencies:
Bash
```bash
yarn add graphql-tag express-session node-fetch
```
We add session middleware to the server. This must be done prior to calling Sapper middleware. Also, the must be passed to Sapper. Sessions will be used when loading the Sapper application. For the API routes, session processing may be abolished.
JavaScript
```js
server.express.use((req, res, next) => {
if (/^\/(playground|graphql).*/.test(req.url)) {
     return next();
}

session({
   secret: 'keyboard cat',
   saveUninitialized: true,
   resave: false,
})(req, res, next)
});

server.express.use((req, res, next) => {
  if (/^\/(playground|graphql).*/.test(req.url)) {
return next();
  }

  return sapper.middleware({
session: (req) => ({
   id: req.sessionID
})
  })(req, res, next);
});
```
In Part 1, we considered the data model for Prisma, which must be updated for further work. The final version is as follows:
JavaScript
```graphql
type QuizVariant {
  id: ID! @id
  name: String!
  value: Int!
}

type Quiz {
  id: ID! @id
  title: String!
  participantCount: Int!
  variants: ! @relation(link: TABLE, name: "QuizVariants")
}

type SessionResult {
id: ID! @id
sessionId: String! @id
quiz: Quiz!
variant: QuizVariant
}
```
In the updated data model, quiz results are shifted to the type. The type stores results in a particular session’s quiz.
Next, we need to update the src / client / apollo.js file using server-side rendering. We forward the link to the function, since is not available in Node.js runtime.
JavaScript
```js
import ApolliClient from 'apollo-boost';
import fetch from "node-fetch";

const client = new ApolliClient({
uri: 'http://localhost:3000/graphql',
fetch,
});

export default client;
```
Since this is a frontend application, we will use and , connected via CDN to simplify the markup.
To simplify support for resolver logic, we shift all the resolvers to a single file (src / resolvers / index.js).
JavaScript
```js
export const quizzes = async (parent, args, ctx, info) => {
return await ctx.prisma.quizzes(args.where);
}

export default {
Query: {
     quizzes,
},

Mutation: {}
}

```
Как создать викторину в Telegram?
Для создания викторины в Telegram необходимо использовать ботов-сервисы, которые позволяют создавать и настраивать различные опросы и викторины внутри чата или канала. Один из таких сервисов — @quizbot.


Для создания викторины необходимо отправить боту команду /newquiz и следовать инструкциям. Нужно ввести название викторины, вопросы и возможные ответы на них, выбрать тип вопросов и ответов (один или несколько вариантов ответа), а также время, на которое будет ограничена викторина.
Кроме @quizbot, существуют и другие боты, которые позволяют создавать викторины в Telegram, например, @quiz_creator_bot или @quizmakerbot. Они имеют более широкий функционал и могут использоваться для создания не только викторин, но и других интерактивных игр и опросов.
Важно помнить, что викторины в Telegram могут использоваться не только для развлечения, но и для образовательных и маркетинговых целей. Они могут помочь повысить вовлеченность аудитории и получить от нее обратную связь
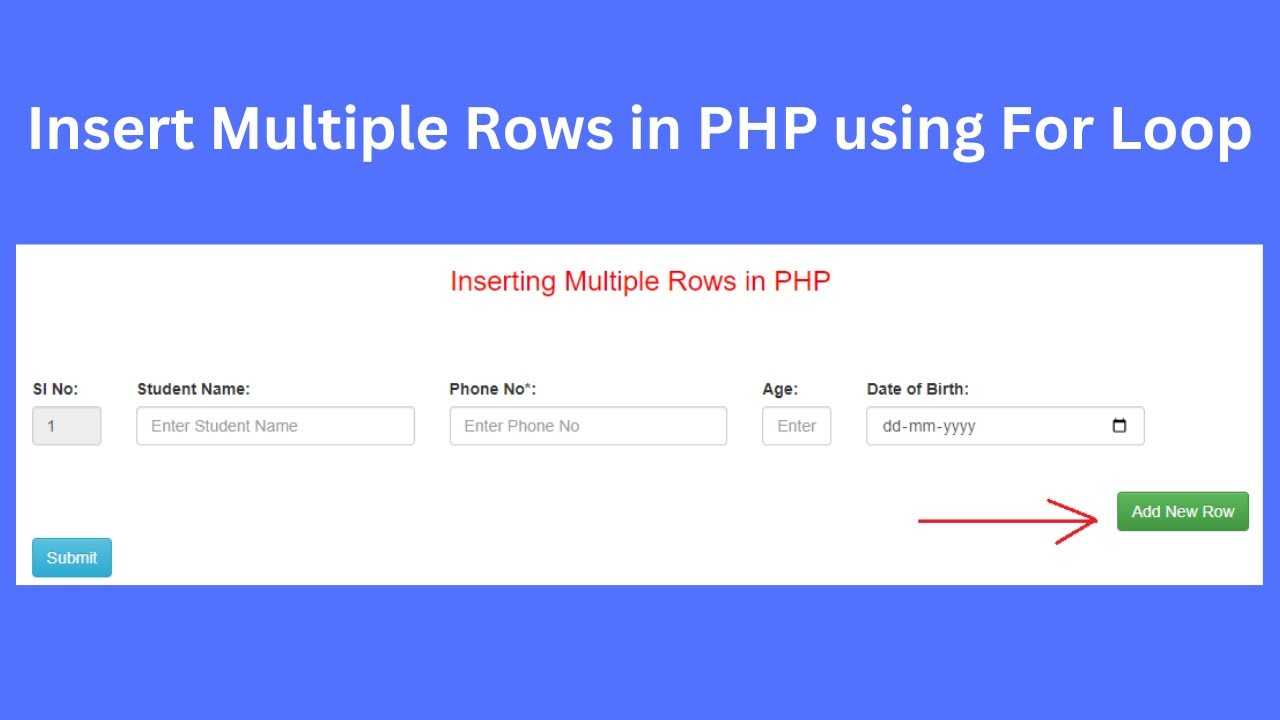
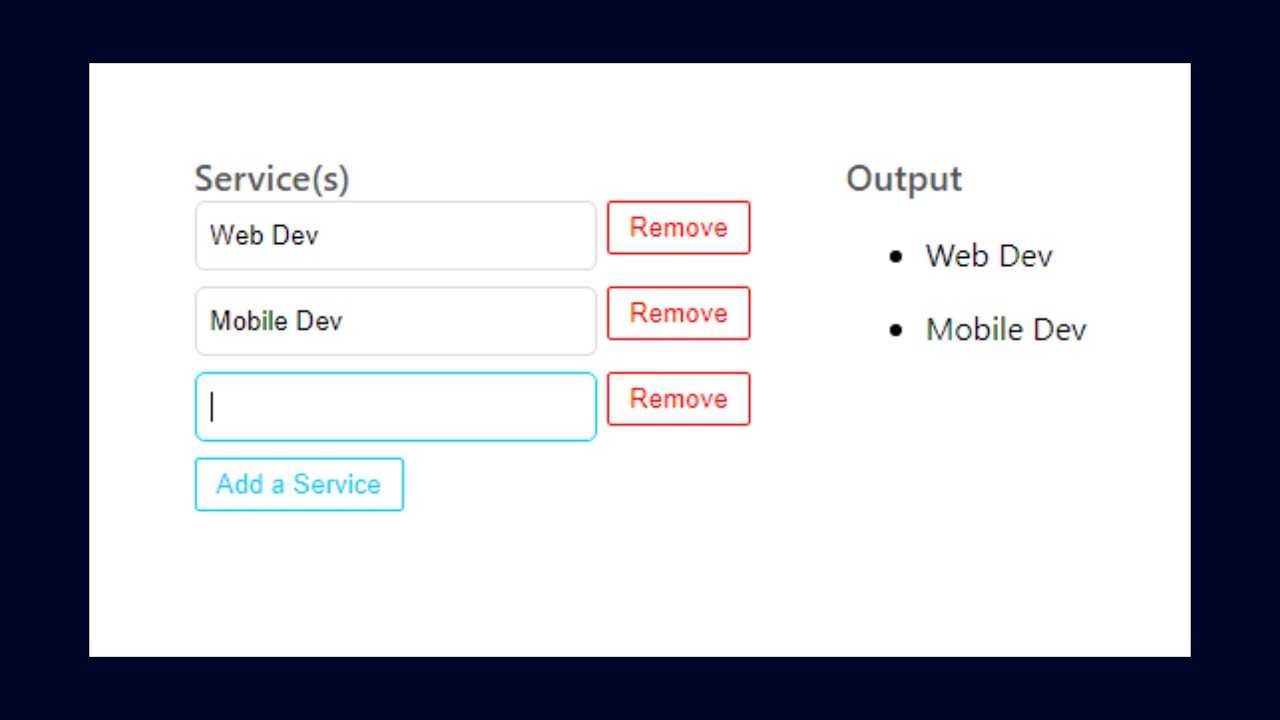
#Efficiently Manage Multiple Address Forms in React: Dynamic Addition and Removal with Clean State Handling
let’s simplify the code for handling multiple forms in React. First, we’ll address the redundancy of the state. It can be derived from the length of the array, so we’ll remove it. Additionally, we’ll use the hook to keep track of unique IDs for each address.
This refactored code uses a single state for the addresses, dynamically generates forms, and handles adding and removing addresses. The ens each address has a unique identifier. The function updates the state based on user input.
I’m trying to create something where a user can add multiple addresses, with a maximum of 3 and the default one which can’t be removed. I could have 3 separate states for each address and just target the state values in the forms that way, but I’d like to know if you guys have a cleaner approach to doing something like this. addressCount is redundant state and should be removed as it can always be computed from address (namely, address.length). The code can be simplified like so:
Introduction
In the first part of this article, we considered the problems of full-stack application development, along with the use of Prisma and Sapper as a potential solution.
Sapper is a framework that allows for writing applications of different sizes with Svelte. It internally launches a server that distributes a Svelte application with optimizations and SEO-friendly rendering.
Prisma is a set of utilities for designing and working with relational databases using GraphQL. In Part 1, we deployed the environment for Prisma-server and integrated it with Sapper.
In Part 2, we will continue developing the quiz application code on Svelte and Sapper, and integrate it with Prisma.
Как настроить параметры Quiz mode в Telegram?
Шаг 1: Откройте Telegram и выберите главное меню в верхнем левом углу экрана.
Шаг 2: Выберите раздел ‘Настройки’, а затем перейдите в подраздел ‘Конфиденциальность и безопасность’.
Шаг 3: Найдите ‘Quiz mode’ и активируйте его, переключив переключатель в положение’включен’.
Шаг 4: Отредактируйте параметры Quiz mode в соответствии с вашими предпочтениями:
- Время ответа: задайте отведенное время, в течение которого пользователь должен ответить на вопрос.
- Количество попыток: задайте, сколько раз пользователю разрешено попытаться ответить на вопрос.
- Результаты: выберите, хотите ли вы получать уведомления о результатах Quiz или сохранять их только на устройстве.
Теперь вы знаете, как настроить параметры Quiz mode в Telegram, и можете наслаждаться функционалом Quiz mode согласно своим предпочтениям. Не забудьте сохранить настройки после внесения изменений.
Embed a quiz in SharePoint Server/On-Prem
Note: Also use this method in SharePoint Online/O365 if embedding on a classic/wiki page (not modern experience).
- With your form open in Microsoft Forms, click “Share”, the “Embed” icon and “Copy”
- Create a script editor web part where you’d like to place the quiz.
- Edit the web part
- Edit Snippet
- Paste the copied code, adjusting the default height of 480px to a height that fits your space appropriately and shows more of the quiz. Click OK.
- Save/publish your page!
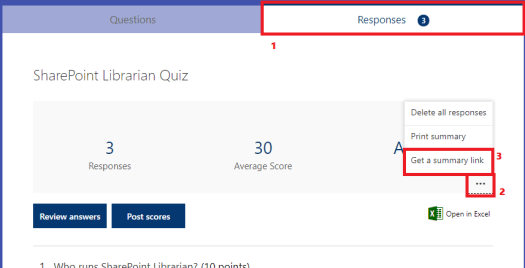
Note: If you want to embed responses in Server/On-Prem or classic pages, use the “summary link” from your responses page in a “Page Viewer” web part in SharePoint.
Update a single quiz
Scope:
Update a single quiz for the course.
Request Parameters:
| Parameter | Type | Description | |
|---|---|---|---|
| course_id |
Required |
integer |
no description |
| assignment_id |
Required |
integer |
The id of the assignment associated with the quiz. |
| quiz | string |
The title of the quiz. |
|
| quiz | integer |
The ID of the quiz’s assignment group. |
|
| quiz | number |
The total point value given to the quiz. Must be positive. |
|
| quiz | DateTime |
When the quiz is due. |
|
| quiz | DateTime |
When to lock the quiz. |
|
| quiz | DateTime |
When to unlock the quiz. |
|
| quiz | string |
The type of grading the assignment receives. Allowed values: , , , , |
|
| quiz | string |
Instructions for the quiz. |
|
| quiz | string |
Specifies which type of Calculator a student can use during Quiz taking. Should be null if no calculator is allowed. Allowed values: , , |
|
| quiz | boolean |
Whether IP filtering is needed. Must be true for filters to take effect. |
|
| quiz[] | string |
Specifies ranges of IP addresses where the quiz can be taken from. Each range is an array like , or null if there’s no restriction. Specifies the range of IP addresses where the quiz can be taken from. Should be null if there’s no restriction. |
|
| quiz | boolean |
Whether multiple attempts for this quiz is true. |
|
| quiz | boolean |
Whether there is an attempt limit. Only set if multiple_attempts_enabled is true. |
|
| quiz | Positive Integer |
The allowed attempts a student can take. If null, the allowed attempts are unlimited. Only used if attempt_limit is true. |
|
| quiz | string |
Whichever score to keep for the attempts. Only used if multiple_attempts_enabled is true. Allowed values: , , , |
|
| quiz | boolean |
Whether there is a cooling period. Only used if multiple_attempts_enabled is true. |
|
| quiz | Positive Integer |
Required waiting period in seconds between attempts. If null, there is no required time. Only used if cooling_period is true. |
|
| quiz | string |
Specifies the settings for questions to display when quiz taking. Allowed values: , |
|
| quiz | boolean |
Whether to allow user to return to previous questions when ‘one_at_a_time_type’ is set to ‘question’. |
|
| quiz | boolean |
Whether the results view is restricted for students. |
|
| quiz | boolean |
Whether points are shown. Must set result_view_restricted to true to use this parameter. |
|
| quiz | boolean |
Whether points possible is shown. Must set result_view_restricted to true to use this parameter. |
|
| quiz | boolean |
Whether to show items in the results view. Must be true for any items restrictions to be set. |
|
| quiz | boolean |
Whether item response is shown. Only set if display_items is true. Must be true for display_item_response_correctness to be set. |
|
| quiz | boolean |
Whether item correctness is shown. Only set if display_item_response is true. Must be true for display_item_correct_answer to be set. |
|
| quiz | boolean |
Whether correct answer is shown. Only set if display_item_response_correctness is true. |
|
| quiz | boolean |
Whether Item feedback is shown. Only set if display_items is true. |
|
| quiz | boolean |
Whether answers should be shuffled for students. |
|
| quiz | boolean |
Whether questions should be shuffled for students. |
|
| quiz | boolean |
Whether an access code is needed to take the quiz. |
|
| quiz | string |
Access code to restrict quiz access. Should be null if no restriction. |
|
| quiz | boolean |
Whether there is a time limit for the quiz. |
|
| quiz | Positive Integer |
Limit the time a student can work on the quiz. Should be null if no restriction. |


Широкий спойлер
Самое основное — «широкий» спойлер, который я сначала использовал у себя в статьях, потом его начали использовать и другие юзеры, а ещё чуть позже он уже стал появляться на системных страницах и даже на главной странице сайта.
Тыкнуть
Антыкнуть
ААААААААААА
Код для него:
`module CSS`
#page-content .collapsible-block {
    margin: 16px 0;
    border: 1px solid #dcdcdc;
    background: white;
    box-shadow: 0 2px 3px #ccc;
    transition: all 0.3s ease;
}
#page-content .collapsible-block:hover {
    border: #505052 solid 1px;
    box-shadow: 0 2px 3px #ccc;
}
#page-content .collapsible-block-content {
    margin: 16px 24px;
}
#page-content .collapsible-block-unfolded-link {
    text-align: center;
}
#page-content .collapsible-block-folded {
    text-align: center;
}
#page-content .collapsible-block-link {
    font-weight: bold;
    text-transform: uppercase;
    text-align: center;
    padding: 18px 24px;
    display: block;
}
/* часть ниже убирает границы спойлера в спойлере */
#page-content .collapsible-block .collapsible-block {
    border: none;
    box-shadow: none;
}
/* а эта убирает отступы внутри спойлера в спойлере */
#page-content .collapsible-block-content .collapsible-block-content {
    margin: 0px;
}
[]
Примечание: Это изменит все спойлеры на странице на широкие спойлеры. Чтобы изменить какой-то один, вам нужно будет подредачить код.
Embed a quiz in SharePoint Online/O365
- With your form open in Microsoft Forms, click “Share”, the “Link” icon and “Copy”
- On a modern page, click to add a web part where you’d like and choose the “Microsoft Forms” web part
- Paste the copied URL in the right pane and choose whether you want to see a summary of responses, or allow people to complete the quiz in the new web part.
The following shows the comparison between the embed web part on a modern page (adds a scroll bar, doesn’t look as clean, requires you to input dimensions manually to improve) and the two Microsoft Forms web parts (much cleaner, resizes dynamically to fit available space.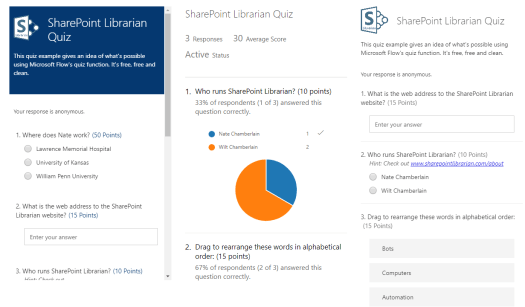
Publish your page and you’re done!
Ready for more? Challenge yourself with Flow possibilities.
- Set up a flow to collect responses on a weekly basis and send you the spreadsheet
- Set up a flow to notify you whenever someone scores lower or higher than a certain threshold
- Ask for email as a “text” field, don’t enter any correct answers, and then email respondents a summary of their result and more information about the topic of the quiz. If you’re only sharing your quiz inside your organization (not anonymous) you don’t need to ask for email as people will be signed in to take the quiz and you’ll get their email automatically.
Какие ограничения есть у Quiz mode в Telegram?
Quiz mode в Telegram — это удобный и интересный формат викторин для пользователей мессенджера. Однако, как и любой другой функционал, Quiz mode имеет свои ограничения и ограничения.
Во-первых, Quiz mode позволяет создавать только одну викторину в группе или канале, что может быть ограничением для организаторов крупных сообществ. Кроме того, в одной викторине можно задать не более 200 вопросов.
Во-вторых, Quiz mode позволяет использовать только текстовые вопросы, то есть невозможно использовать викторины с картинками или видео. Это может ограничить возможности создания креативных и оригинальных викторин.
Запуск Quiz mode также требует наличия прав администратора в группе или канале, что может быть ограничением для тех, кто не является администратором, но хотел бы создать викторину для других участников.
- Таким образом, Quiz mode в Telegram имеет ряд ограничений, которые необходимо учитывать при создании викторин.
- Тем не менее, это удобный и простой формат, которым можно легко поделиться с другими пользователями мессенджера.
Какие примеры использования Quiz mode в Telegram?
Обучение сотрудников и студентов. Quiz mode в Telegram может быть использован в качестве обучающего инструмента в различных сферах: от бизнеса до образования. В удобном формате доступны тесты и викторины для проверки знаний сотрудников или студентов.
Организация конкурсов и акций. Quiz mode в Telegram может быть использован для проведения конкурсов среди аудитории канала или чата в Telegram. В победителей могут входить участники с самым высоким баллом или с наибольшим количеством правильных ответов.
Проведение опросов. Quiz mode в Telegram может быть использован для проведения опросов внутри чата. В опросах могут участвовать все участники группы или канала. Таким образом, можно легко организовать голосование за определенную тему или идею.
Проверка знаний покупателей. Quiz mode в Telegram может быть использован для проведения тестов на знание продукта или услуги. Таким образом, можно оценить знание продукта у потенциальных покупателей или разобраться, где могут возникать проблемы с продажами.
#Streamline Lesson and Quiz Submission: Paginated Form Structure in React
To structure your multiple paginated forms for simultaneous submission, you can manage state in the parent component and pass necessary state and functions as props to the child components. Here’s how you can do it:
In this code:
- The component manages the state for both lesson and quiz data using .
- and functions update the respective data when changes occur in the child components.
- The function is called when the submit button is clicked, and it can handle the submission logic for both forms.
- Props are passed to child components ( and ) to update the state in the parent component whenever there’s a change in the form data.
This structure allows you to keep your forms modular and manageable while enabling simultaneous submission of both forms when needed.
I have a page that has a button of Add a new lesson that when it’s clicked it opens up a modal to insert the necessary information of the new lesson. A new lesson requires 2 steps, the first step is about the lesson title, description, attachment files..etc and the 2nd step is to add a new Quiz that is related to the lesson. So I am planning to make it paginated because both steps are quite big they can’t be in the same page. There are 2 buttons that helps navigate between pages, and a Button to submit the lesson.